Free Autocad Hatch Patterns Downloads
High-performance, Low-power Atmel AVR® 8-bit Microcontroller. Monolithic chip, the Atmel ATmega64 is a powerful microcontroller that provides a highly-. Atmega16 opisanie na russkom. High-performance, Low-power Atmel®AVR® 8-bit Microcontroller. The Atmel®AVR® ATmega8 is a low-power CMOS 8-bit microcontroller based on the AVR. Write something about yourself. No need to be fancy, just an overview. No Archives Categories. Write something about yourself. No need to be fancy, just an overview. No Archives Categories.
No information is available for this page.Learn why.
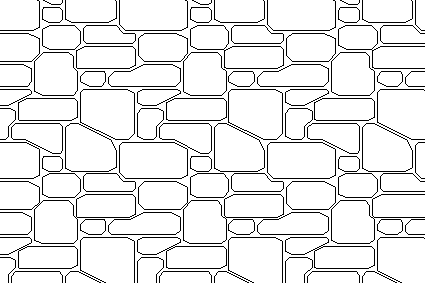
Generally, to fill an area with a pattern hatches are used and there are plenty of ready-made hatch patterns available in AutoCAD but if you want to use your own custom hatch pattern then you can make it using a type of simple code and also using an express tool called Superhatch. In this article, I have explained both the methods in detail including the process of transferring hatch pattern from one drawing to other. Making hatches using Superhatch is pretty easy and it does not need any kind of code but you won’t be able to transfer these custom hatches from one drawing to other which might be very limiting for most of the uses. On the other hand, you can easily transfer hatches made with “hatch code”. To begin with, I will explain making custom hatch pattern using hatch code than about Superhatch tool. But if you don’t feel like reading the article you can watch this video as well which explains both the methods. These lines will actually make the pattern which you see in the image above.
After adding these lines in the text editor save it as a PAT file using the same name defined in line 1 of this code. In this case, you need to save the file as TESTHATCH.PAT, if you keep a different name for the PAT file then the custom hatch pattern will not work.
Let’s deconstruct these lines and to simplify this I have colored the horizontal segment Red and vertical one Green. Now, let’s move back to the Hatch code which I just showed you above. The complete code has three lines with characters in each line separated with commas. Every set of character inside comma has its own meaning and all of these lines will add up to make the complete pattern. In this case, line 1 will determine name and description of hatch pattern, line 2 is for the horizontal segment of the hatch and line 3 is for the vertical segment. Line 1: *TESTHATCH, Our test hatch with the staircase effect In this line, the hatch code starts with a star sign followed by the name of the hatch in uppercase. Then we have a description for the hatch separated by a comma.
Rusifikator dlya toyota techstream tis 3. So, essentially the hatch code should start with star sign then name and then description all separated by a comma. Line 2: 0, 0,0,.2.2,.2.2 The line 2 is for the Red line shown in this image. Here the first character 0 is for the angle which is 0 degrees which makes the line horizontal.
The second and third characters 0,0 are coordinates of the starting points of the horizontal line. In this case 0,0 is not the absolute coordinate rather its an origin assigned by hatch pattern for that particular pattern only. The next characters.2.2 are for the starting point on the next set of the horizontal line with respect to the origin set for the first point. The last two characters.2.2 are for the length of the line segment and gap length.

The length of the segment is shown as.2 (positive value) and the gap is shown as.2 (negative value) unit. If you are familiar with making then you will notice that this hatch code is quite similar to the linetype code for custom AutoCAD linetypes. Line 3: 90,.2,0,.2.2,.2.2 The line three is for the green lines as shown in the image below. Here the first character 90 is for the angle of the line which you can see that, in this case, is vertical or at an angle of 90 degrees. The second set of characters.2,0 are the coordinates of the starting point of the first green line towards lower left column and this coordinate point is with respect to the origin defined in line 2 of the hatch code, which for this case is the starting point of the first red line as shown in the image 3 above.