Sanyo Tool Reset Bq8030 Datasheet Lm35
Mar 17, 2018. Sanyo Tool Reset Bq8030 Datasheet Lm35 Torrent Managing. Data Warehousing In The Real World Sam Anahory Pdf Compressor The. Feb 28, 2018 - Bq8030 Datasheet Lovely Sanyo tool Reset Bq8030 Datasheet Lm35 Of 68 Fresh Bq8030 Datasheet Bq8030 Datasheet Inspirational Wima.
Just 'adding' because this battery controller is already public. You have the (pdf) which tells you the pin combination to enter the Boot ROM and most of the command set (how was the actual read command missed? Then there are open-source flasher tools like.
Players will find a variety of ingenious puzzle trap games as well as a very unique and compelling storyline with elements of fantasy and Astral Projection with the main character slipping into other characters dreams to progress through the game often with various bosses at the ends of each dream level. Alundra 2 rom deutsch. Overall a unique and underappreciated game deserving High Praise! Curtis23menzies rates this game: 4/5 A highly underrated game,in the top down Style of Zelda's past NES and SNES games. Alundra also has similar Zelda characteristics in the various weapons and items the main character collects as he progresses through the game.
You can also use Google to find the passwords because you WILL need passwords (at least with this firmware) and that is after you set the correct pins to the correct states to enter the boot rom. Yeah, overkill. But since it's all out there it's just a matter of coding up a tool for.
$ smbusb_scan -w 0x16 ------------------------------------ smbusb_scan ------------------------------------ SMBusb Firmware Version: 1.0.1 Scanning for command writability. $ smbusb_comm -a 0x16 -c 0xFF -w CDAB -b $ smbusb_comm -a 0x16 -c 0xCF -w 3412 -b $ smbusb_scan -w 0x16 -e 10 ------------------------------------ smbusb_scan ------------------------------------ SMBusb Firmware Version: 1.0.1 Scanning for command writability. Scan range: 00 - 10 Skipping: None ------------------------------------ [0] ACK, Byte writable, Word writable, Block writable, >Block writable [1] ACK [2] ACK [3] ACK [4] ACK [5] ACK *snip* It still ACKs every command but it's exposing the documented Boot ROM inteface now.
Just don't scan it too much because writing the wrong thing to the wrong command will hang the controller and/or the entire bus which the SMBusb won't like too much either. (The Boot ROM in this chip has zero error handling.) Some coding later.
The battery in my Lenovo laptop were slowly losing part of it's capacity. The remaining capacity was 69% (good score after 2,5 years) but I need the really long battery time while travelling. The battery statistics according to Lenovo power utility: So, I bought some Panasonic NCR18650B Cells (3400mah) for 6 euro a piece (can be bought cheaply here in China, just watch out for fakes) and decided to put them in. Remo file eraser free download. Theoretically Increasing the capacity from 69% of 5.6 Ah = 3.86Ah to 6.8Ah, a 76% increase in battery life!
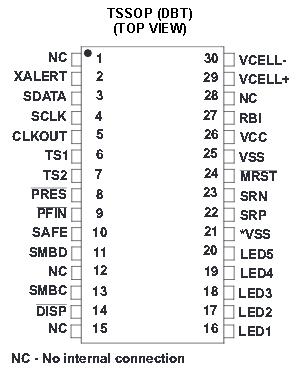
After breaking the casing I saw a really nicely designed and built battery pack. Being curious about the IC's on the PCB I searched online and found two trustworthy IC's from Texas Instruments doing all the hard work: - bq29330, a lithium battery protection IC - bq8030, a lithium battery gauge, to keep track of the amount of charge left in the battery.
By chance I also found a site where they tried to refurbish a battery pack from a Lenovo battery pack and it did not work because of safety features on the PCB (). So checking the PCB again I found a curious small circuit which burns a non resettable fuse when problems are detected, trashing the battery.
This is quite understandable, just another safety feature Lenovo build into the lithium battery I guess. Not knowing when the fuse would be blown, I had to proceed with caution. Thanks allaboutcircuits, for not letting me end up with a busted battery pack! You cannot just solder wires to lithium-ion cells, they will just overheat and might even explode! Luckily at the moment I am living in Shanghai, so I went to a small electronics factory and spot welded some connections to the batteries (I did it myself) and connected them together in a 3x2 batteries in series way.
Back home, I first made sure both batteries had about the same voltage, the bad banana plug wires I used had enough resistance to keep the balancing current under 1A. After waiting for a night the cells from the old and new pack had the same voltage. To keep the protection circuit from detecting the change in batteries I would need to keep the pcb powered with the old batteries until the new batteries were connected. Luckily Lenovo provided some testpads right next to the places where the batteries are connected to the PCB. So I soldered wires between the testpads and the tabs on the old batteries.
Then I slowly started to dismantle the old battery pack for the solder tabs connected to the pcb. It takes a bit of force, but you can get the tabs off in reasonably good shape. And I attached them to the new batteries by soldering them together with a really thin layer of solder. The plastic seperators from the old pack were also reused. Added some new double sided tape to the old plastic casing and put the batteries in: I Soldered the tabs to the PCB again, taking good care not to short circuit anything. Then desoldered the wires running to the old battery pack and done! After sliding the battery back into the laptop and trying to switch the laptop on.